iOS App Development with Swift: Best Practices and Tips
Get practical, real-world advice on developing iOS apps with Swift—beyond basics, it's about making smarter development decisions.

Let's be honest. Developing an iOS app isn't just about writing lines of code and hoping everything works out. If it were that easy, every high schooler with a laptop could launch the next billion-dollar app. In reality, it's about making deliberate, smart decisions—some of which are less about code and more about structure, efficiency, and the team behind the code. After years of developing apps, I've come to realize that the real differentiator is not technical skill alone, but how we apply that skill.
In this blog post, I'll unpack some best practices and tips for iOS development using Swift, drawing from both successes and scars. This isn't a basic tutorial; it’s a dive into the kinds of nuanced challenges we all face and the hard-won lessons that get us from a good app to a great one.

Start With the End in Mind: The Architecture
There’s a famous quote by architect Frank Lloyd Wright: “You can use an eraser on the drafting table or a sledgehammer on the construction site.” It’s the same with app architecture. You want to make your biggest decisions up front so that you're not playing catch-up with changes down the line.
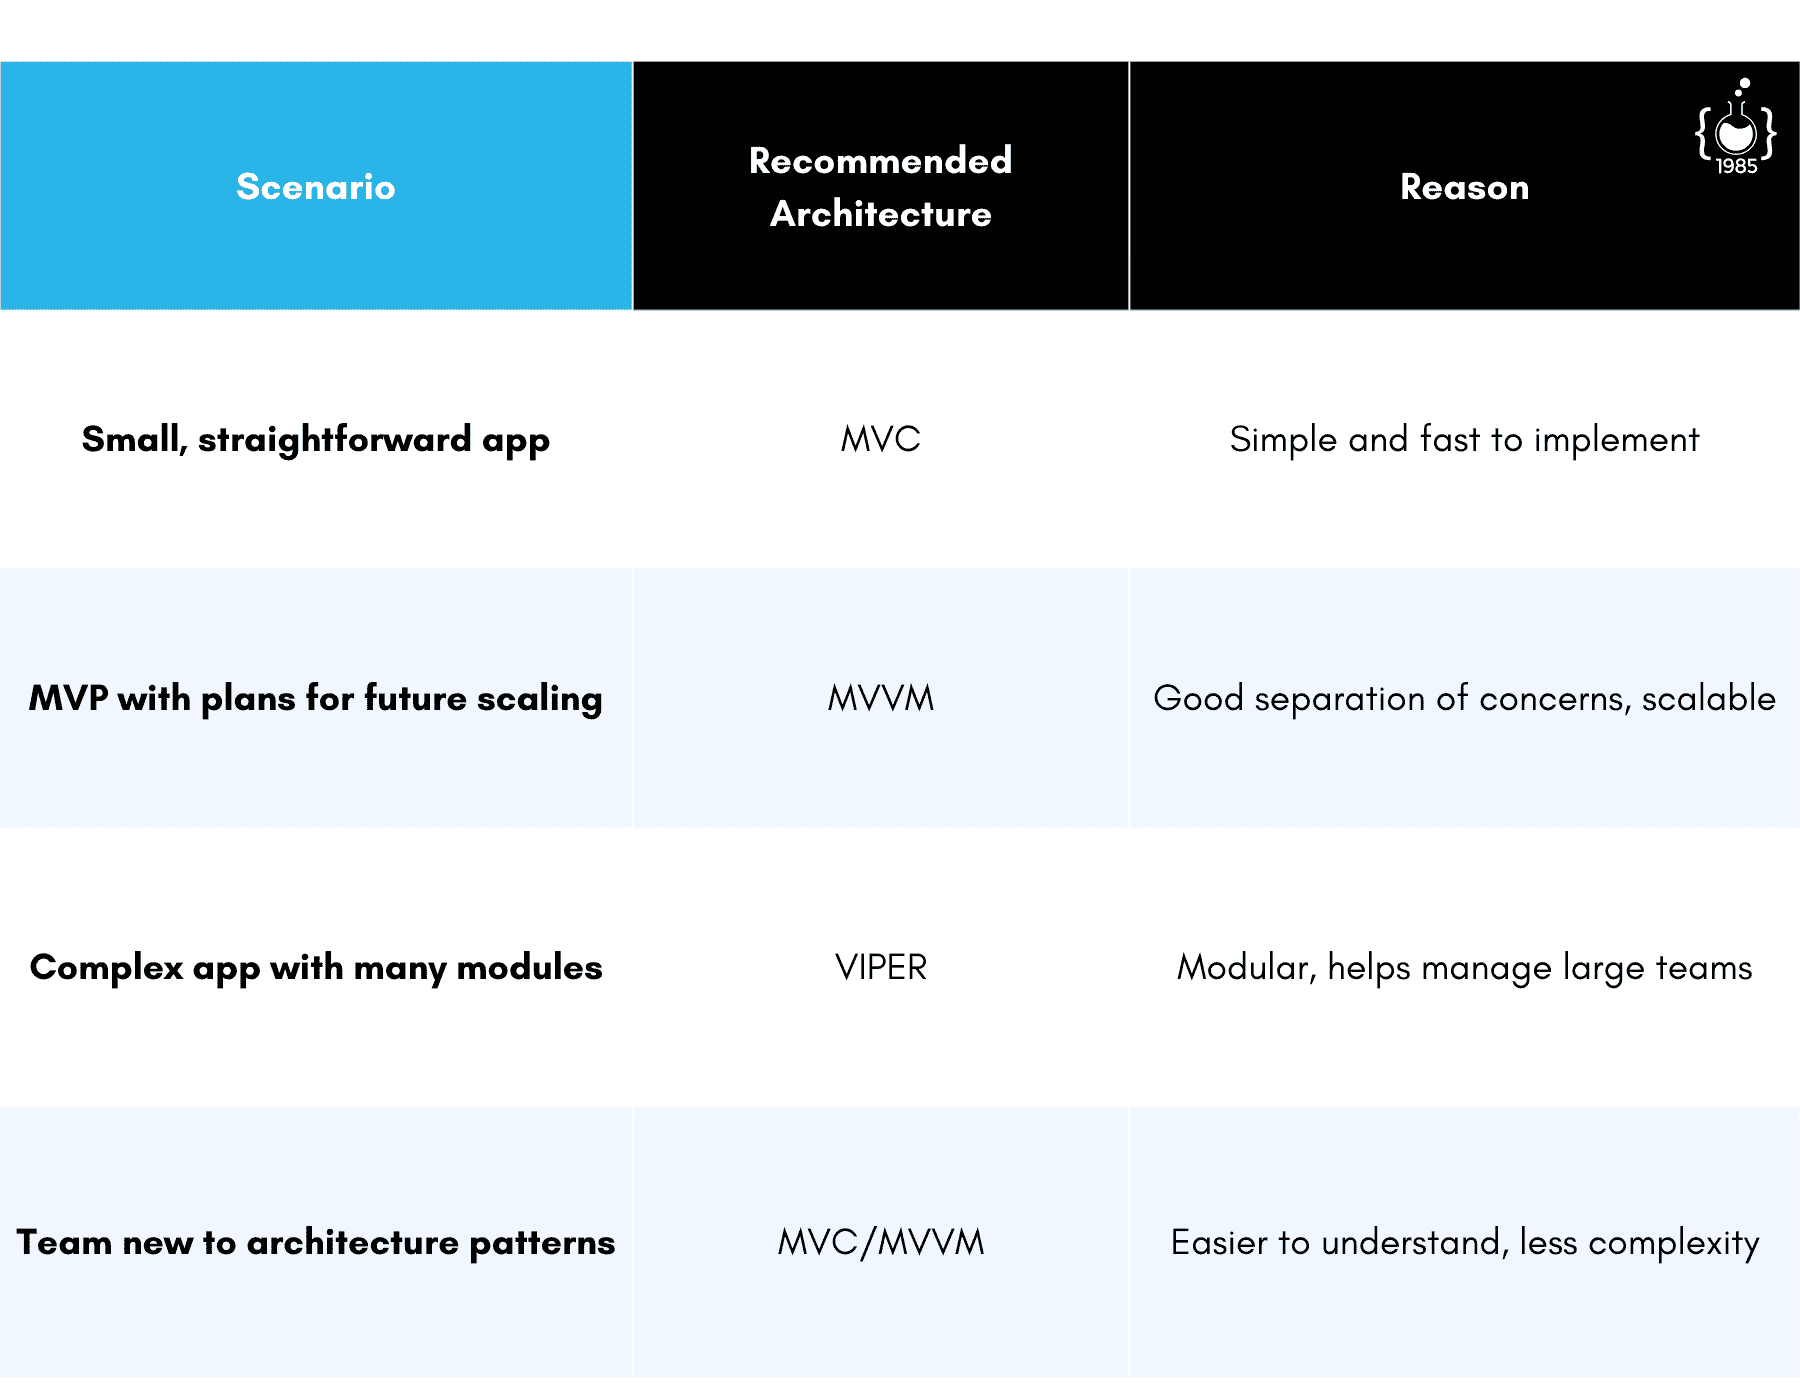
For Swift, the prevailing architectural choices often include MVC (Model-View-Controller), MVVM (Model-View-ViewModel), or even VIPER for the brave. But the trick isn’t in picking the "right" one; it’s in sticking to it and in adapting it to your team’s strengths. The MVC is quick and simple, but as your app scales, controllers tend to become monolithic and harder to test. Moving to MVVM can help separate concerns, but it often introduces complexity with data-binding, particularly when you’re dealing with larger applications.
A word of advice—before you architect, know the scope of your app. Are you building an MVP? Stick with MVC but be disciplined. Are you expecting growth? A switch to MVVM or even VIPER will pay off. We once re-architected an MVP halfway through development—from MVC to MVVM—because we lacked a clear vision early on. That mistake cost us weeks. Learn from my errors.
Keep in mind: Choosing a complex architecture just because it’s trendy can cripple development. Always consider your team's skill set and the project timeline.

Testing: Less Sexy, More Critical
No one loves testing. But if you think about it, there's something satisfying about seeing those green checkmarks light up after a good test run. In Swift development, testing can make or break a project’s lifecycle.

Unit Testing with XCTest should be a staple for any iOS app. It’s straightforward, integrated, and provides just the kind of assurance that allows your engineers to sleep at night. Write unit tests as you write code, not after you build the entire module—that approach never ends well. The "I'll write tests later" mentality inevitably leads to skipping tests when deadlines loom.
In my experience, code coverage often becomes an unhealthy vanity metric. Focus less on ensuring you’re hitting a magical percentage and more on writing meaningful tests that reflect your app's most critical workflows. Testing isn't a numbers game; it's about covering your bases where it counts.
To add another layer, consider UI Testing using Xcode's built-in tools. This type of testing can sometimes be flaky, but it’s valuable in ensuring user interactions perform as expected. And trust me, if there’s something that a QA tester or user will find wrong, it’ll probably be a flow your unit tests missed.

Managing State: Avoid the Spaghetti Monster
State management in an iOS application is probably one of the trickiest parts to get right. SwiftUI's arrival on the scene has revolutionized how we think about state, but with great power comes great responsibility.
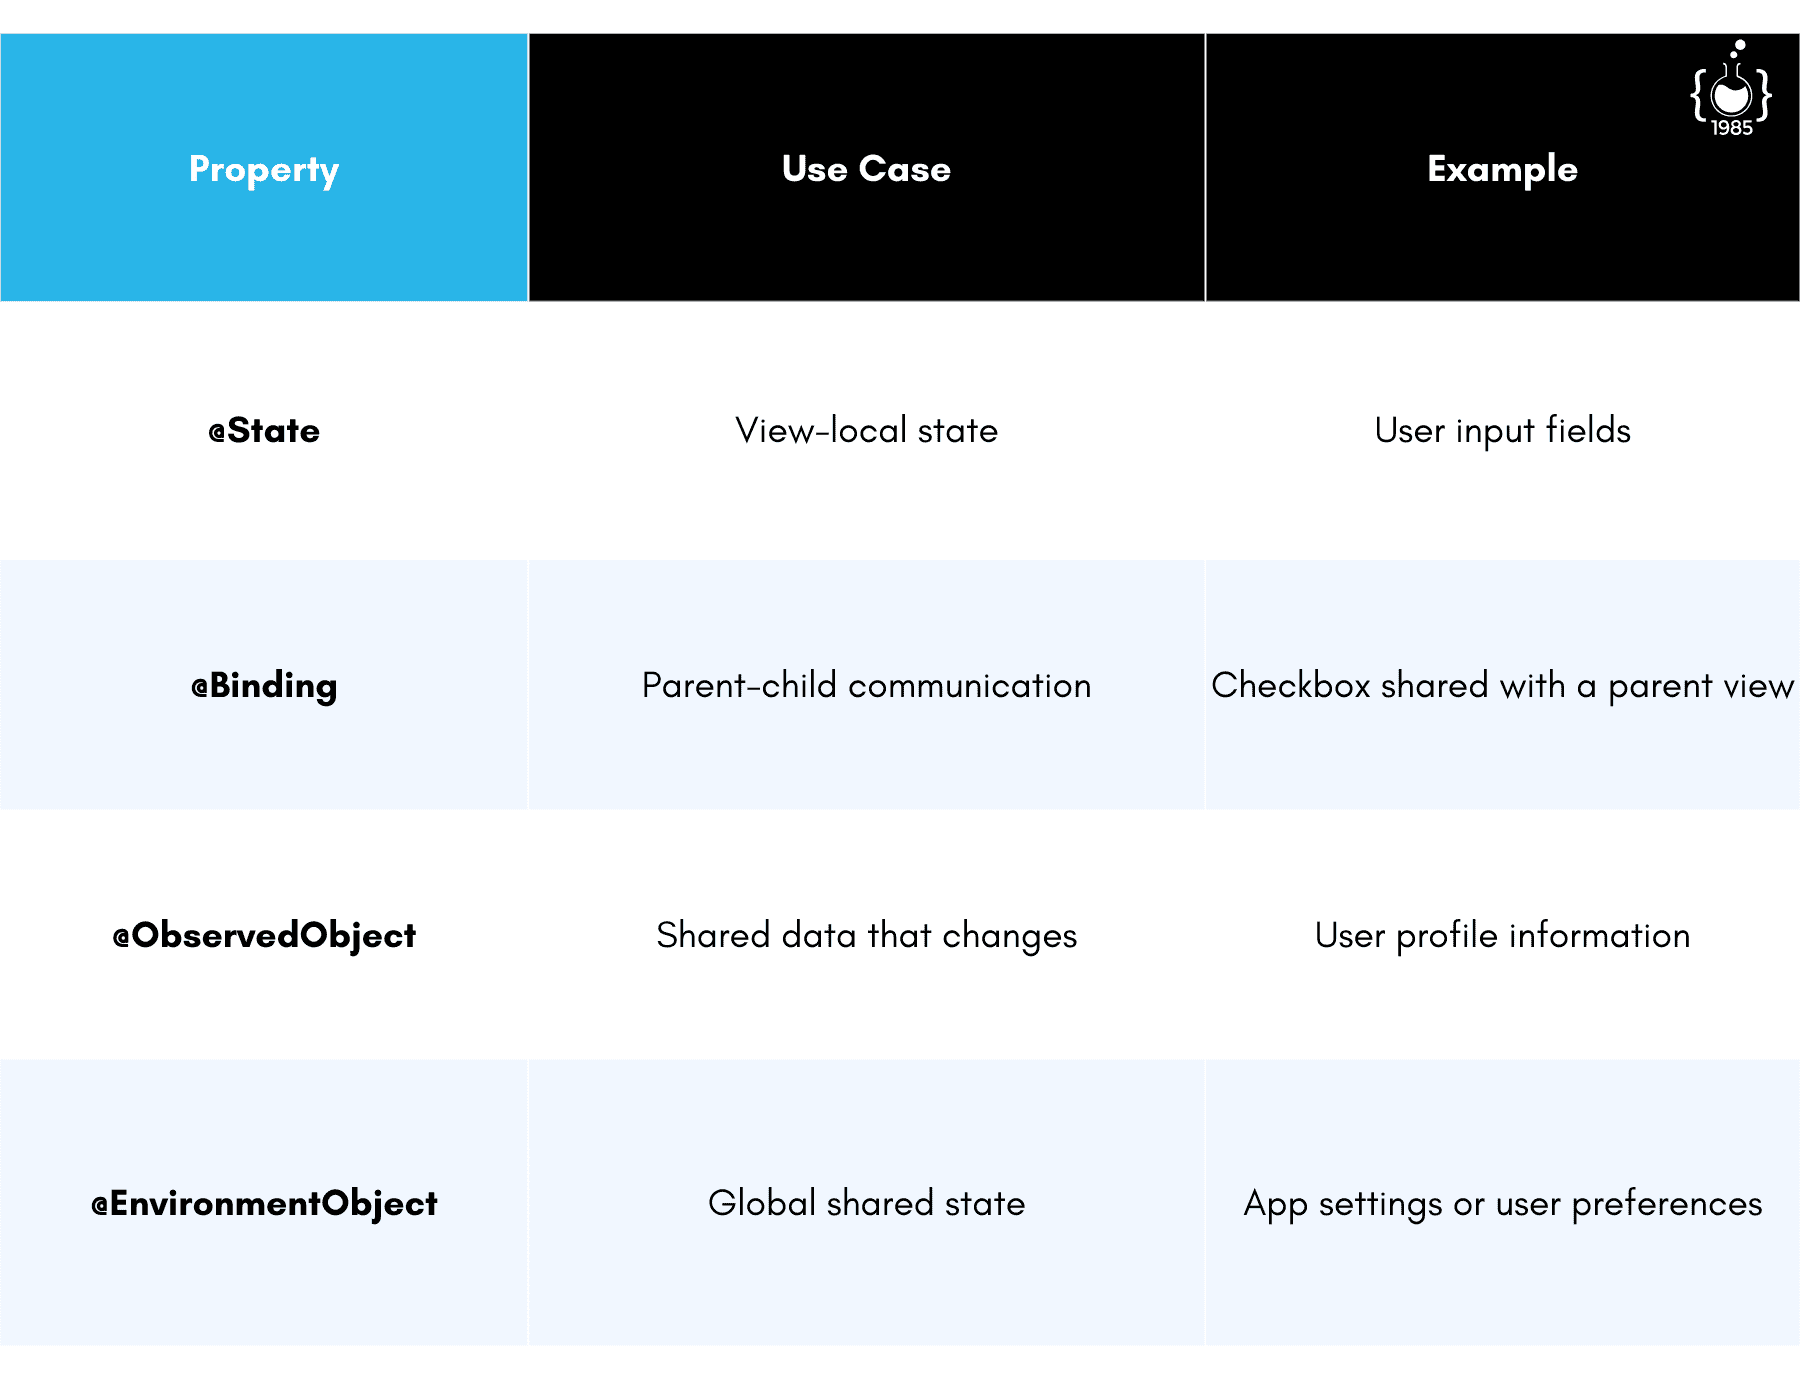
One of the most common pitfalls I’ve seen developers fall into is misusing @State, @Binding, or @ObservedObject. This misunderstanding often leads to unclear data flows, unexpected UI behaviors, or worse, a crash-prone mess that’s impossible to debug. The key here is to understand the lifecycle of the properties you’re using. Use @State for view-level states, @ObservedObject for data that can change and needs to be shared, and @EnvironmentObject for global state.

For larger apps, you may want to use something more robust, like Redux-style state management, to centralize all your state changes. One particularly painful project comes to mind where we were managing state using a combination of singleton classes and environment objects. It was a breeding ground for inconsistency—sometimes state would update, sometimes it wouldn't. Moving to a centralized reducer-based model helped bring some sanity back.
Tip: The more centralized your state management is, the easier it is to maintain consistency across your views, but the trade-off is increased complexity. You’ll need to strike a balance based on the project.

Dependency Management: Swift Packages vs. CocoaPods
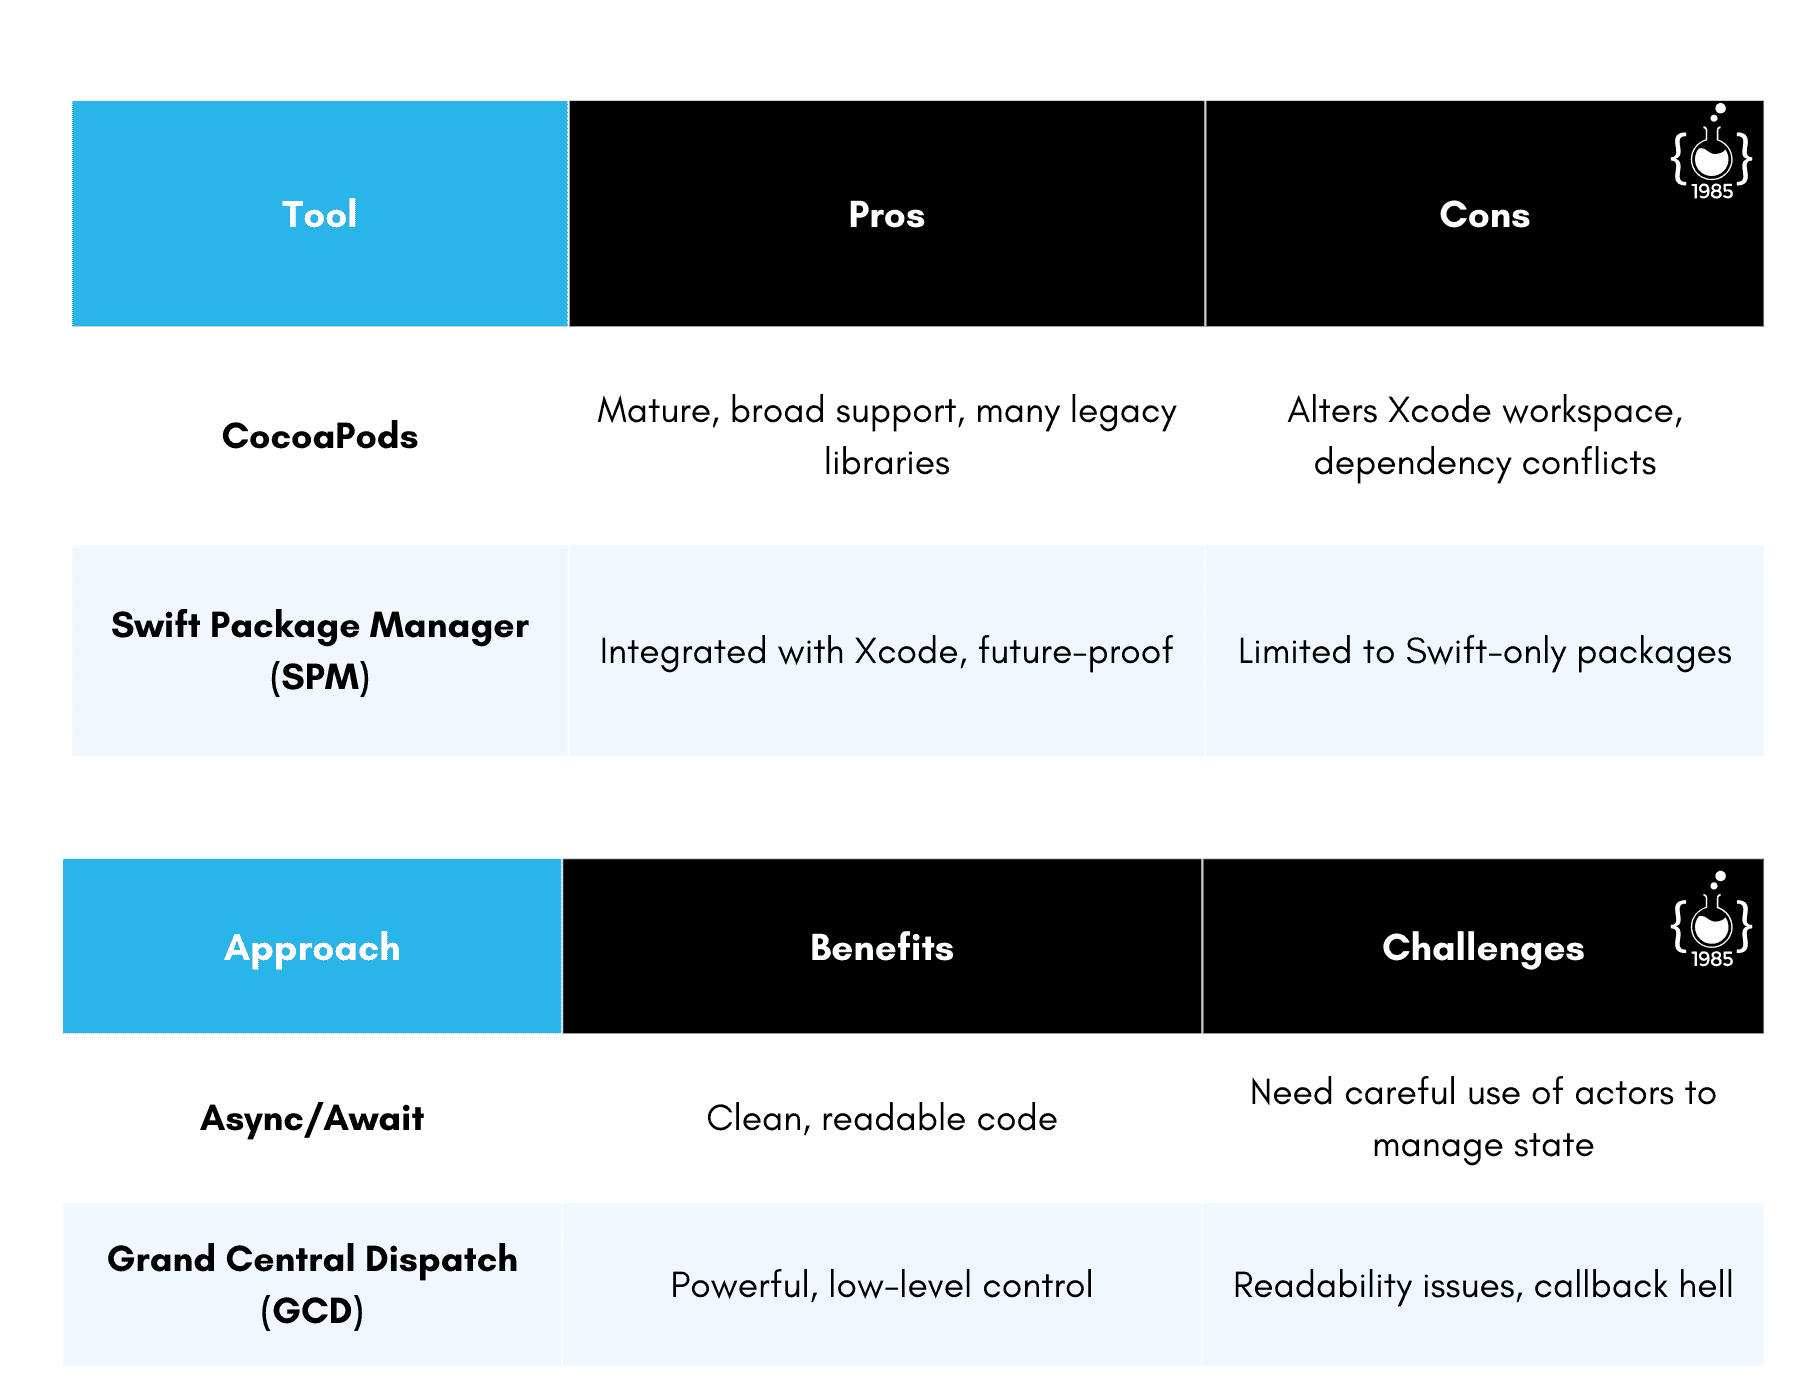
If you've been in the iOS game long enough, you've probably used CocoaPods at some point. For a long time, CocoaPods was the go-to solution for third-party dependency management in iOS development. But with the advent of Swift Package Manager (SPM), the choice has gotten tougher—and better.

Swift Package Manager is now tightly integrated with Xcode, making it a natural choice for most modern projects. It provides a more seamless experience and is less likely to cause conflicts, whereas CocoaPods modifies your workspace, which can sometimes lead to issues, especially when collaborating across teams.
In my experience, unless you have a legacy codebase deeply tied to CocoaPods or need a dependency that hasn't migrated to SPM, use SPM. It’s less hassle, more future-proof, and the Apple ecosystem likes to play nice with its own tools.
Note: Migrating a project from CocoaPods to SPM can be painful if not planned well. Make sure to clear out old dependencies cleanly and verify builds on different team members’ machines before celebrating too soon.

Swift Concurrency: Embrace Async/Await
Concurrency has always been a point of pain in iOS development. Dealing with Grand Central Dispatch (GCD), thread management, and callback hell has kept many developers awake at night. With Swift 5.5, we now have async/await—a game changer for managing asynchronous code.
Async/await simplifies code readability significantly. Instead of deeply nested callbacks, you have a linear-looking sequence of events. However, the introduction of async/await also means dealing with actors to ensure data safety, particularly for classes that might be shared across threads.
In one of our recent projects, we reworked the network layer to use async/await. The readability improvement was striking. Not only was the code easier to understand, but the incidence of subtle timing bugs dropped drastically. There was a learning curve for the team—particularly around converting old completion handler-based methods—but the payoff was worth it.
A word of caution: Async/await is not magic. It won't make poorly thought-out logic magically efficient. You still need to pay attention to how many tasks you spin up and their interdependencies.

Performance Tuning: Instruments is Your Friend
Performance issues can sink an app. We all love shiny UI and smooth animations, but achieving that requires rigorous performance monitoring and tuning. Xcode Instruments is the unsung hero in this regard.
One of the best tips I can give here is to profile early and profile often. Instruments, particularly the Time Profiler, can give you insights into what's eating up CPU cycles. Memory leaks are another big culprit, especially with Swift and ARC (Automatic Reference Counting). Use the Leaks instrument regularly to catch those retain cycles before they become an issue. The earlier you find these problems, the easier they are to fix.
I remember a particular app where we faced significant frame drops during scrolling. Using Instruments, we discovered an overzealous developer (me) was repeatedly decoding images from disk rather than caching them. It was a rookie mistake but one that Instruments helped pinpoint quickly.
Tip: When dealing with lists, use lazy loading techniques. Preload just enough data to keep scrolling smooth and load more as needed.

Embrace Continuous Integration (CI)
If you’re developing without CI, you're playing with fire. Setting up a proper Continuous Integration pipeline with tools like Jenkins, CircleCI, or even GitHub Actions ensures that every pull request triggers a build and test cycle. This practice helps catch integration issues early and allows for quick turnaround on bugs.
CI tools combined with code linting (like SwiftLint) make sure your code adheres to best practices and keeps technical debt in check. The sooner you incorporate CI/CD, the better. A well-implemented CI setup can also help with deployment—having fastlane scripts to automate beta releases saves hours of manual work.

Localization: Go Global From Day One
Here's something we’ve learned the hard way—adding localization to an app after development is far more challenging than if you’d started out with it in mind. Even if you think your app is only targeted at an English-speaking audience today, you never know when a request will come in for other languages.
Localizable.strings should be an early addition to your codebase. If you need persuasion, think of localization as future-proofing. Plus, users love apps that speak their language. It’s a huge trust factor, especially in global markets.
Another aspect often overlooked is RTL (Right to Left) language support. Supporting languages like Arabic and Hebrew isn’t just about translating words; it often means rethinking UI layouts. Plan for this early on, and you'll save yourself a lot of pain when those requests inevitably come.
Final Thoughts: The People Factor
One last thing—don’t forget that development is as much about people as it is about code. The team you build, the tools you use, the architecture you decide on—all are driven by the people making decisions. Clear communication, shared vision, and a culture that encourages learning from mistakes go a long way. A good team can turn a bad app around, but even the best app can't survive a bad team dynamic.
So if you’re in charge of development, prioritize building a culture that respects the process as much as the outcome. Tools change, languages evolve, but a team that learns and adapts is always future-ready.


